


Briefing Your First Classic Game, Pt. 2
How did this happen? Why me?

In the last post we briefed the facts of game 23 of José Raúl Capablanca’s 1909 match against longtime American champion Frank Marshall. A short version of those facts is something like this:
Marshall v. Capablanca arose from a Queen’s Gambit Declined. After the opening, the players entered a middlegame in which material was even, with all the minor pieces traded off except the light-square bishops. Black had a queenside pawn majority and White had a kingside pawn majority. And there was an open d-file not claimed by either side.
Black marched his queenside pawns down the board, supported by his bishop. Black also seized control of the open d-file with his rook and used it to infiltrate White’s position.
Eventually, Black traded his advanced pawn majority for White’s bishop, gaining a material advantage. Black began advancing his kingside pawns to further weaken White’s king position and begin constructing a mating net. Faced with forced checkmate in five, White resigned.
Now that we know what happened, in this post we’re going to start asking ourselves questions to understand how Black built his winning attack.
But first, let’s get theoretical.
How Chess Games Are Won
The familiar story is that the early chess players of the Romantic Era thought that chess games were won by brilliance and combinative skill. It was the first world champion, Wilhelm Steinitz, who showed that these combinations do not arise from the brilliance of the players, but from the accumulation of small advantages. Gather enough of these advantages and you have a winning position. The brilliant player can discover the winning combination in a winning position, but he cannot conjure one in a drawn or losing position.
But how does one accumulate these small advantages? One cannot do it by force. What was implicit in Steinitz’s theory was formalized by the German mathematician and chess player Ernst Zermelo, who in 1913 proved that in any position on the chess board—or any other zero-sum game of complete information in which players take turns and chance is not an element—there are only three possibilities: Either White can force a win, or Black can force a win, or both sides can force a draw.
This is an unbreakable principle—perhaps the most fundamental principle—of the Common Law of Chess.
And this principle carries with it a startling implication: Your moves can never increase the evaluation of a position in your favor. Instead, your best move can only preserve the current evaluation of the position. Every other move, to one degree or another, cedes some advantage back to your opponent. This is why chess engines will tell you your average centipawn loss but have no similar category for average centipawn gain: You can only pick up the centipawns that your opponent has already carelessly dropped.

In short, to win a game, your opponent must first lose it. Your opponent must make an error, and you must use your move to seize the advantage allowed by that error. If your opponent makes enough small errors, and if you seize the opportunity to punish them without making offsetting errors of your own, he will have dug a hole from which he cannot escape, and you will achieve a winning position.
All of which is easier said than done when playing a live game. But when reviewing classic games, we have an advantage: We know the final position, in which the accumulated advantages were so clear that one side resigned. We can then identify those obvious advantages and work backwards to see how the losing side allowed them to arise.
The Beginning of the End
So now let’s start with an advantage we can all recognize: forced checkmate. We already know from last time that Marshall resigned in this position, with his king trapped in a mating net:
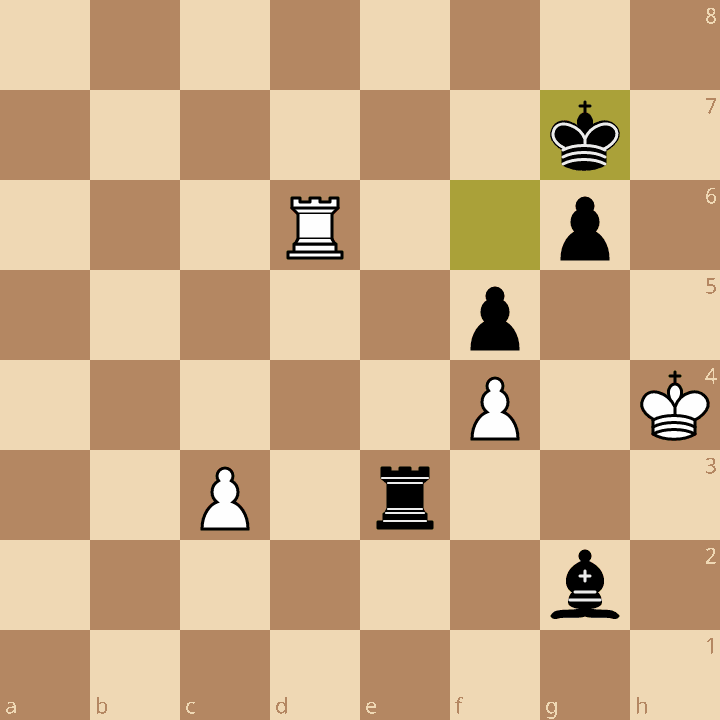
Even if you didn’t know that Black has forced checkmate in five, you wouldn’t need to understand much about chess to evaluate this position as much better for Black and to suspect forced mate exists. That’s because Black’s ability to construct the mating net isn’t some random accident. Instead, it arises from a combination of substantial advantages:
Black’s bishop is better. It has to be because White’s is off the board!
Black’s rook is better. It has infiltrated White’s position, where it is targeting a weak pawn and hemming in White’s king. White’s rook can harass Black’s king for a move of two, but can’t contribute actively to White’s defense.
Black’s pawn structure is better. His connected pawns are harder to attack than White’s isolated pawns. They also control important light squares around White’s king. White has a passed pawn, but it is five moves away from promoting, so not a serious threat.
Black’s king is better. Though exposed, Black’s king is more mobile and can contribute both to the defense of his pawns and control of dark squares around White’s king. White’s king has almost no safe squares.
Transforming Advantages
Let’s take just one of these advantages—Black’s extra bishop—and investigate how that advantage arose.
We know from our fact summary that Marshall didn’t blunder a full bishop to some tactic. Instead, he exchanged it for Black’s advanced pawn majority. So the story of Black’s final material advantage has two parts: First trading the pawn majority for a bishop, then winning those two pawns back.
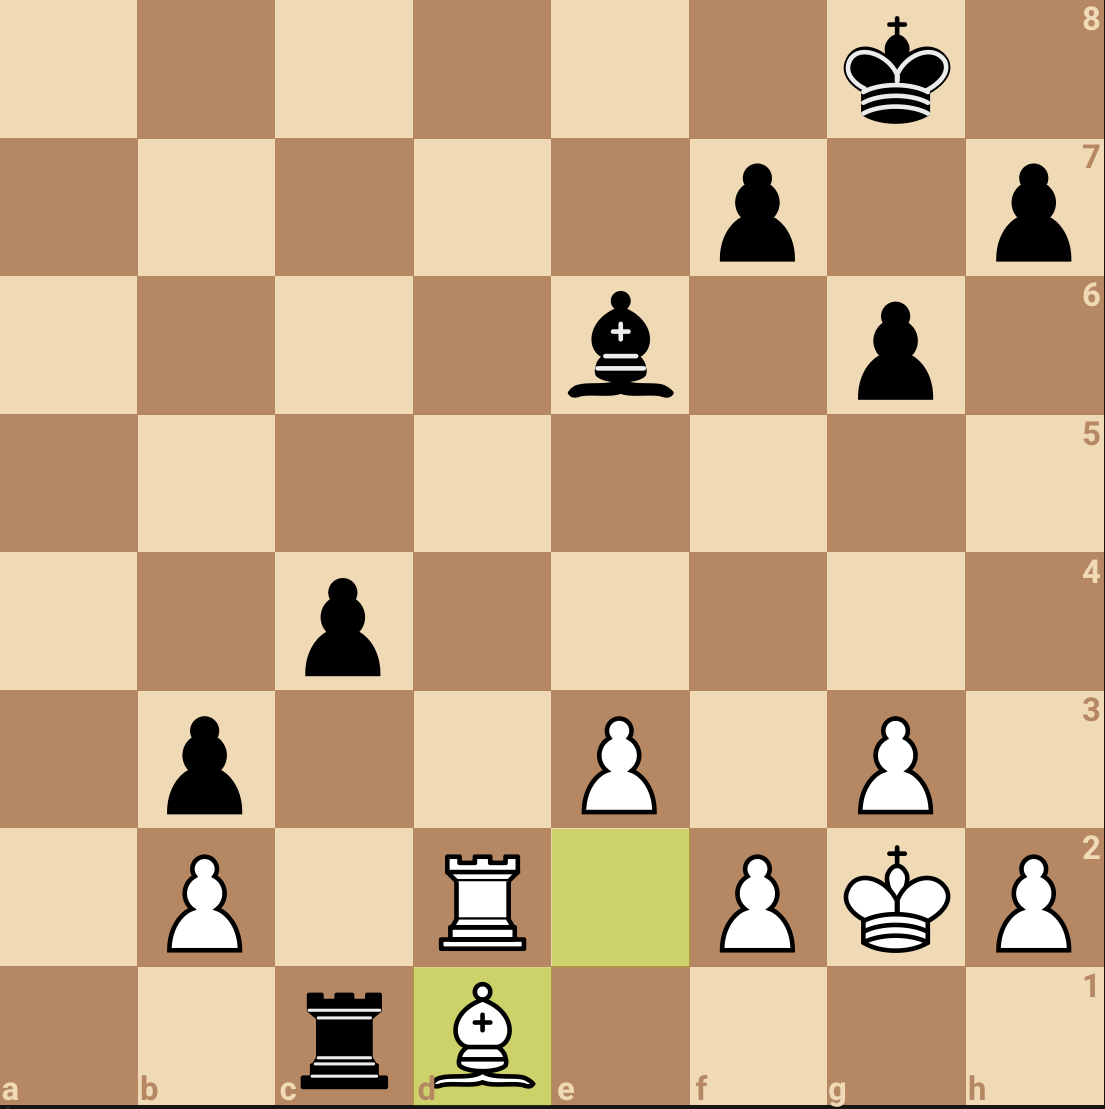
Let’s focus on the first of these—giving up the bishop for two pawns. This wasn’t a mistake, it was a necessity. After Black played 33….c3 in the following position, White must stop Black from promoting a pawn, and giving up the bishop after 34. bxc3 b2, 35. Rxb2 Rxd1 is the way that loses the least material (see for yourself):
Seizing Advantages
The cool thing is that because White chose the best defense, we know that the evaluation of Black’s position cannot have improved between moves 33 and 35. He didn’t gain any advantage, he transformed a positional advantage into a material advantage of equal (or lesser) value.
So how did that positional advantage arise? How did Black’s pawn majority get so strong that it was worth trading a bishop for?
After all it started out like this:

If Black has an advantage here, it’s a small one. He has a queenside pawn majority. He also has a bishop that is well positioned to support that majority if he can advance it far enough. His bishop is slightly better than White’s because, as we now understand, it’s pointed at where the action is going to be. White’s bishop is on a beautiful long diagonal—the kind patzers like me covet—but it’s pointed behind the advancing pawns.
For Black’s pawn majority to become a monster, White will have to make mistakes and miss opportunities. And now we have an easy way to identify those. We just have to ask whether White’s moves impede Black’s pawn majority and superior bishop from reaching their full strength, or assist them in doing so.
For example, White’s next move was great:

White has just played 17. Qe4! Strategically, this improves the position of the queen in several ways, most notably by giving it unimpeded access to the queenside along the fourth rank. But the move also contains a tactical threat with a strategic basis.
What the idea? White has pinned Black’s bishop to his unprotected queen. If allowed, White will next play Bh3. White isn’t expecting Capablanca to take the bishop and hang his queen. Instead, he wants to force the bishops off the board after, e.g., 17…b6, 18. Bh3 Re8, 19. Bxe6 Qxe6, 20. Qxe6 Rxe6, when the game is equal. (Naturally Capablanca saw this and played 17…Qc7, unpinning his bishop and maintaining the queen’s protection of the c5 pawn.)
In contrast, White made a terrible move in this critical position that arose after move 18:
Knowing what made Black’s pawn majority so strong, White’s move, 19. a3?, is obviously bad because it allowed 19…c4! Black’s pawn is now supported by his bishop and becomes the backbone of his advancing pawn majority. This also frees Black’s queen from its defense of the c-pawn, allowing it to potentially do other things
What move would have been better for White? The answer is equally obvious: 19. b3!, preventing 19…c4.
Try this for yourself with this and other advantages. You’ll be surprised at how easy it is to identify moves that allow Black to claim and build his advantage and alternative moves that would have put up more resistance.
The Seeds of Positional Advantages
It’s been a long post and I swear we’re almost done. But we haven’t discussed anything about the opening, and if Marshall v. Capablanca is a game about how to play with a queenside pawn majority and a slightly superior minor piece, we should at least see where those tiny imbalances came from. So, having come this far, let rewind just a little bit further and figure out where the first hints of Black’s advantage arose.
And here it is:

White has just played 11. Ne5. Black responds with 11. Nxd4. Despite initial appearances, White has not blundered a pawn. By moving his knight to e5, Marshall has a discovered attack on Black’s knight on e4, which is now attacked twice and defended only once So Marshall knows that he can capture both the piece and the pawn on d5 defending it, restoring the material balance.
Presumably, Marshall wanted to eliminate the d5 pawn to give scope to his fianchettoed bishop. But the consequence is that Black has seized the opportunity to establish a queenside pawn majority and open the d-file and now has a clear plan for the middlegame. Marshall was a fantastic chess player and a sharp enough calculator that he could have seen this result, but he evidently misjudged the final position. Or perhaps more likely, being six games down in the match and having come off nine consecutive draws, he took a risk, hoping that Capablanca would choose an inferior continuation.
Play did not have to proceed this way. White could have instead played 11. dxc5, leaving Black with an isolated queen’s pawn position. Indeed, White had a couple chances to inflict an IQP on Capablanca, but passed them up. According to the databases, current masters prefer 9. dxc5 to Marshall’s 9. Bg5.
Judging by the results in this game, who can blame them?
Conclusion and Next Steps
We’ve now been through Marshall v. Capablanca forwards and backwards. If you’ve applied the techniques in this post to Black’s other advantages, then you know not only what happened in the game, but why it happened
Remarkably, our analysis contains almost no lengthy variations or difficult calculation, and we haven’t once looked at a computer evaluation. Yet we understand the game at a much deeper level.
You could stop there if you want and you’ll already have gotten plenty from studying just this one game. But chess is inexhaustible. As Professor Kingsfield warned:
At times you may feel that you have found the correct answer; I assure you that this is a total delusion on your part. You’ll never find the correct absolute and final answer. In my classroom there is always another question, another question to follow your answer.
If you’re inclined to ask further questions, consider the following:
Read Capablanca’s own annotations to the game. What does he comment on that you may have overlooked? What did you find significant that he didn’t mention? Is there anything you agree or disagree about? Did you reach any of the same conclusions for different reasons?
Try replaying the game from memory. Are there moves you overlooked (perhaps the quiet 23…g6)? What were the consequences of not playing those moves when they were played?
Turn on the engine—you’re allowed now—and check the alternative moves you thought up for White. Are they better? If the computer suggests a move you didn’t think of, can you see how that move advances Whites strategic goals?
Select a position where Black has a large advantage and try playing that position against the computer. Can you convert the win against a more tenacious defense?
I hope you find these techniques helpful. Having laid them out in such (probably excessive) detail here, future posts won’t be as long. Instead, I’ll post classic games and raise some questions that I think are worth considering while we both teach ourselves to think more like chess players.
Terrific analysis. Absolutely loved it! I’m going to try and incorporate this method in how I analyze games. Thank you!!